Contents
Application Introductions
OBS
ProPresenter
Epson Setting Assistant (iPad)
DM3 StageMix (iPad)
OBS Blade (iPad)
Description of Scenes
General Video Event Flow
~7-10AM
~10 AM
Opening Ceremonies (~10:30 AM)
Match Play (Qualifiers & Playoffs)
Lunch
Alliance Selection (~3:30 PM)
Awards
End of Event
Application Introductions
OBS
First, let’s walk through the OBS application. The screenshot shows a typically operating instance of OBS.
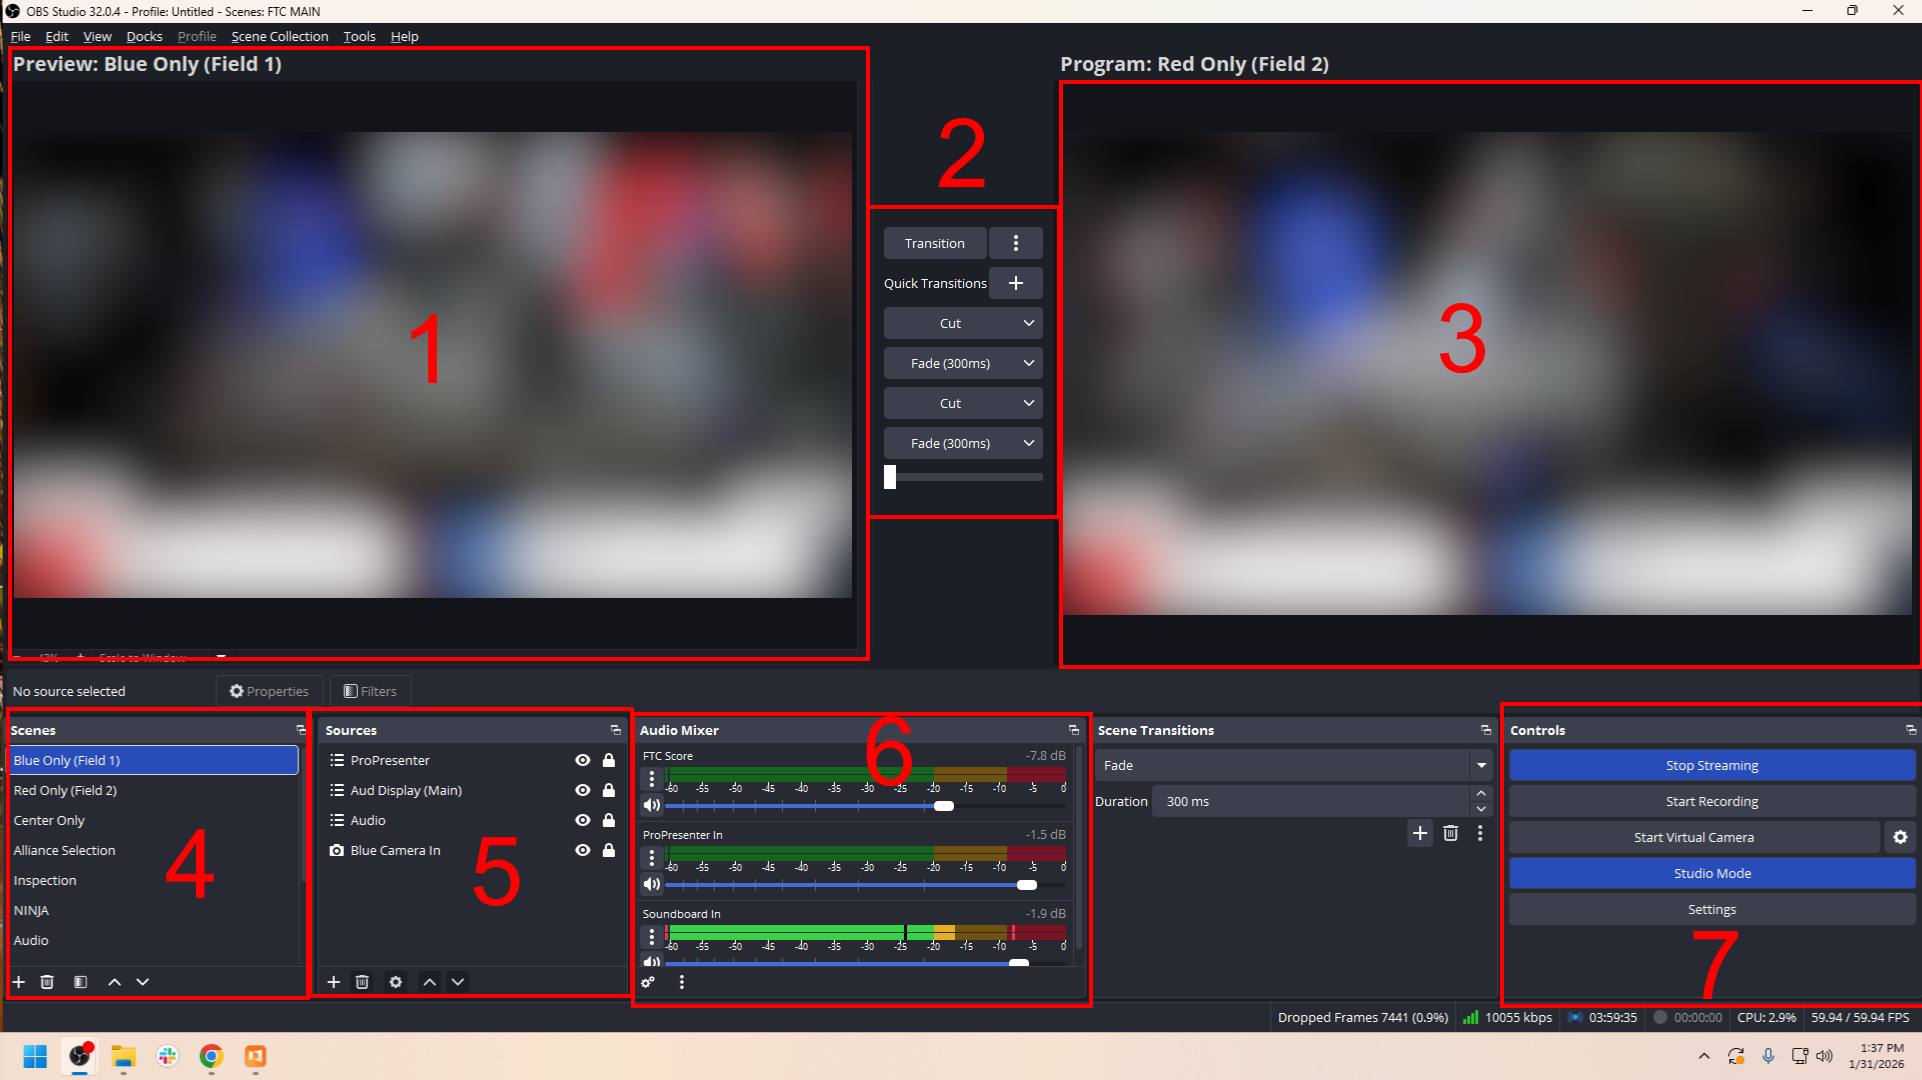
- Preview window. This shows a preview of the picture before it goes ‘live’. You can make changes to the elements in the video without it showing to the audience.
- Transition panel. This provides several ways in which the preview image becomes the program, or live image. The “Transition” button triggers the default transition, with shortcuts to individual transitions underneath. Finally, a slider allows manual transition between the images.
- Program window. This shows the image as it is displaying to the audience and livestream. You cannot directly edit this image, instead changes are made to the preview window and transitioned to the program window (with a few exceptions).
- Scene list. This is a list of all discrete views that can be shown on screen. Typically, these involve at least one camera with a scoring system overlay composited over top of it. Each scene is composed of one or more sources.
- Source list. This shows the list of source(s) that makes up the currently-selected scene. In this case, the scene “Blue Only (Field 1)” is composed of four sources. OBS designates source types by icons, see this OBS article for a list of sources supported by OBS and their respective icons.
FIRST Chesapeake OBS scenes themselves contain scenes as a way to define a single origin point for reused scene elements. See the next section for a description of all common OBS scenes. - Audio mixer. This is a list of all audio sources within the scene currently in the program window with meters to show which audio sources are sending audio to the livestream. Only audio sources within the currently showing scene get sent to the stream.
- Operational controls. This controls basic operation of OBS, such as the settings, mode of operation and whether streaming is enabled.
ProPresenter
This screenshot shows a typical view of ProPresenter.
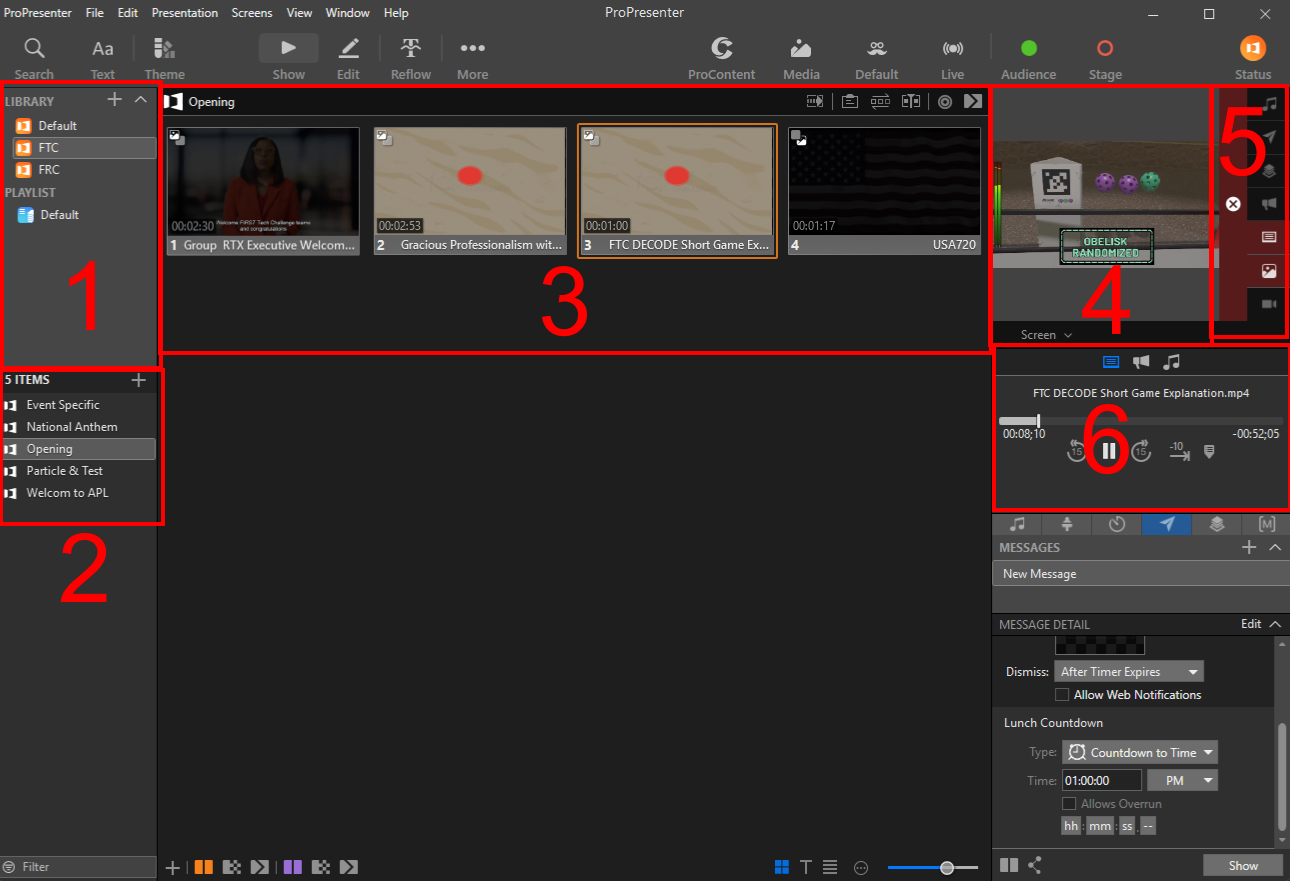
- Library View. ProPresenter contains several levels of organization, each referred to by a different term. Both a Library and a Playlist contain Presentations, shown in the presentation view (#2). Most of our content will be placed into a “Library” appropriate to each specific program.
- Presentation View. This shows the content of the selected library or playlist, which are all technically referred to as presentations. Each presentation consists of slides, which can be traditional visual slides, videos, or a combination. For our usecase, most slide content is videos.
- Slide Viewer. This shows the content of the selected presentation from the Presentation View.
- Output preview. This shows a visual and audio preview of the content being presented.
- Clear Buttons. This stops the content being played. Click the red X to abort the current video.
- Playback controls. This can pause, rewind or scrub within the content being presented.
Epson Setting Assistant (iPad)
This app is used to adjust the projector image to the screen. This application is very simple and utilitarian, so is hopefully self-explanatory. More information on using the app can be found in 4b. Unpack and Setup Projector.
DM3 StageMix (iPad)
This app is used to remotely operate the audio mixer. You can perform the majority of operations on the mixer from this app, including volume and other parameter control.
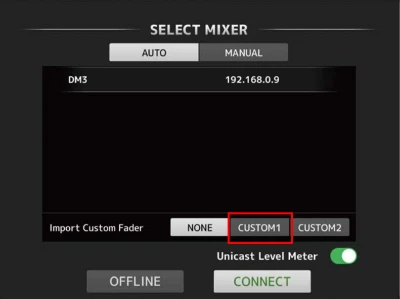
Getting the Fader Layout Onto the iPad
By default, the custom fader banks are not imported from the mixer to the app when connecting. You will need to select “Custom1” on the first screen of the app to sync them.
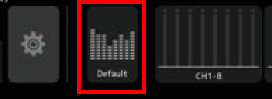
Once connected, tap the button at the top to toggle between default and custom order.
OBS Blade (iPad)
This app allows remote control of OBS running on the Streaming Unit computer. On top of allowing you to switch scenes remotely, you can also preview the currently previewed scene. This is a very helpful feature when adjusting cameras!
Screenshots Coming Soon
Please pardon the lack of iPad screenshots. We are working to get screenshots for this article soon.
Description of Scenes
Our standard OBS setup includes several scenes. Here’s a description of what each of them include.
- Blue Only (Field 1)
Composite scene. The audience display is on top, with a fullscreen display of the camera connected to the “Blue” input on the Streaming Unit underneath it. For consistency’s sake, this should correspond to the camera displaying Field 1. - Red Only (Field 2)
Same as the above, but the “Red” input. This should be Field 2. - Center Only
Composite scene. The audience display is on top, with a fullscreen display of the camera connected to the “Center” input underneath it. This should be the camera capturing the area between the two fields, for opening and closing ceremonies. - Alliance Selection
Composite scene. The audience display is on top, with the center camera input underneath it, scaled down and positioned slightly to the left of center. During alliance selection, the overlay contains a key in this position. Adjustments to the thumbnail may be needed when alliance selection begins. - Inspection
This scene is obsolete. Fullscreen display of the dedicated inspection status screen. In most cases, A/V should ask the scorekeeper to display the inspection status on the audience display, as this display is themed (where the dedicated display is not). - Audio
This scene should not be switched to. This is a “utility” scene that provides the audio from the board to other scenes, so that sources only need to be updated one time to update all relevant video scenes. - ProPresenter
This scene should not be switched to. This is a “utility” scene that provides the input from the video playback application, ProPresenter, to other scenes, for the same reasons as the Audio scene. - Particle
Fullscreen scene. Contains a FIRST Chesapeake logo over looping particle video. Useful for starting/stopping streams or otherwise serving as a scene to cover dead air. - Aud Display (Main)
This scene should not be switched to. This is a “utility” scene that provides the input from the scoring system/audience display, to other scenes, for the same reasons as the Audio and ProPresenter scenes. - Test
This scene is obsolete. Fullscreen display of a projector test pattern. Should not be necessary with the latest projector equipment.
Next, let’s discuss when these scenes are typically used during an event, as well as other ancillary video-related tasks. Note that setup-related items are not listed here, because they are included in the many FTC A/V setup articles.
General Video Event Flow
Venue Open until Start of Stream - Typically 7:00-10:00 AM
- Show Center Only scene with audience display overlay. Audience display should show fullscreen inspection status (ask the scorekeepers to put this up).
- Play event-specific welcome video when crowd begins to enter. ProPresenter will show on top of audience display overlay.
- Recommend alternating between the two periodically.
- When all teams are finished with inspection, it is recommended to alternate between Particle and the event welcome video.
- Conduct a bandwidth and connection test before the stream starts. FIRST Chesapeake YouTube streams have auto-start disabled, so simply starting the stream provides a bandwidth test. Check the YouTube Live Control Room for status messages on the stream health.
Start of Stream - Typically 10:00 AM
- Show Particle scene to start all streams until opening ceremonies.
- Start the stream in both OBS and YouTube. The YouTube stream does not go live publicly when first connected to, and it requires clicking the “Go Live” button in the live control room to publish.
- Note down the time of stream start in the OBS Autoswitcher to provide a start point for stream time stamps. If this isn’t completely accurate, that is OK - the timestamps can be corrected afterwards. Ensure that the Chapter Event is set on “Match Start”, as shown in the screenshot.

Beware of the "Sync with OBS" button
In the YouTube livestream configuration used by FIRST Chesapeake, the time used by the “Sync with OBS” button will be wrong, as it will be the time OBS started streaming - not the time the YouTube stream actually went live. It’s recommended that you manually enter the time you clicked “Go Live”, or an estimation of when this occurred rather than rely on the Sync with OBS button. Use this function only as a last resort, if the start time was completely forgotten.
Opening Ceremonies - Typically 10:30 AM
- Show Center Only scene without audience display overlay. Temporarily disconnect the auto-switcher from OBS to avoid having scenes changed on you by the scorekeepers performing match operations during opening ceremonies.
- You can either request scorekeepers to show “video only” in FTC Live, or temporarily hide the Aud Display (Main) source (click the eye icon to hide) within the Center Only scene.
- Videos play during the opening ceremonies - they are called out in the script. Use ProPresenter to play the videos over the Center Only scene - do not play opening ceremony videos through FTC Live.
- After opening ceremonies conclude, re-connect the auto-switcher to OBS if it was disconnected previously.
Match Play - For Morning Qualifiers, Afternoon Qualifiers, and Playoff Matches
- Alternate (preferably using autoswitcher) between Red Only and Blue Only scenes according to the match currently being played. See the linked section of |Finish OBS Setup (step 12 onwards) for details on configuring the autoswitcher.
Lunch
- Leave the autoswitcher and the scenes alone, but it’s recommended to display a message explaining that the event is at lunch, and when it is scheduled to resume. This is easiest to do by asking the scorekeepers to put up a message with this information.
Alliance Selection
- Show Alliance Selection scene - be aware that you may need to make adjustments to the camera view within the overlay. Pan/zoom the image so that only the area between fields is visible for best effect.
Awards
- Show Center Only scene with audience display overlay. Temporarily disconnect the auto-switcher from OBS to avoid having scenes changed on you by the scorekeepers performing match operations towards the end of awards breaks. Be sure to reconnect after the award break is finished.
End of Event
- Show Particle scene for a few seconds upon event conclusion.
- Stop the stream on both OBS and YouTube. Much like starting, auto-stop is not enabled on our YouTube streams for flexibility, because it does not stop the stream if connection is temporarily lost. Be sure to click the “End Stream” button in YouTube’s Live Control Room to stop the stream for viewers, otherwise they will see an endless buffering icon.
- Copy the chapters from the YouTube Video Chapters section of the FTC OBS Switcher page and paste them into the video description to add the chapters to the video.
- Load the video of the stream and check accuracy of the chapters by clicking a chapter link. The chapters should be placed slightly before the start of the match or at the start of the match. If they are off, the times can be updated by inserting a value (positive or negative, depending on if the timestamp given is behind or ahead of the start of the match, respectively) into the Video Offset field. Once a value has been placed in the offset field, the times will update, and will need to be copy and pasted into the YouTube video description again. Refresh the video page when you make a change to the timestamps and check again until timestamps look good.
Network Issues Can Break Chapters
If you encounter issues with the network when streaming that require you to stop and re-start the stream or that result in complete disconnection from YouTube (e.g., adjusting video bitrate, cable getting unplugged), the chapters output on the auto switcher page will not be accurate. The calculation does not take into account the time on the stream video that is lost when the stream is stopped. As of time of writing, there is no workaround to account for lost time in this manner, and inaccuracy may need to simply be accepted. The only other available option is to correct the timestamps by hand for each match occurring after the stream interruption.