This stage requires the presence of the Emcees and Game Announcers, therefore it may have to wait until the day of competition.
Introductory Concepts
Sound sources go through many different types of volume control in the path from the sound source to its destination. The sum of all of these volume controls is referred to as a “gain stage” or “gain structure”. An optimal gain structure ensures that there is plenty of volume in the signal to be output to the livestream and the event speakers, while preventing distortion during peak signals or unwanted noise in the signal.
Different schools of thought exist on the proper way to adjust gain stages. This approach is designed to utilize manufacturer-provided guidance to make the process as simple as possible.
Setup Procedure
- With the parties who will be using the microphone present, press the knob on the corresponding wireless receiver to open the menu.
- Scroll down to item 3, Gain.
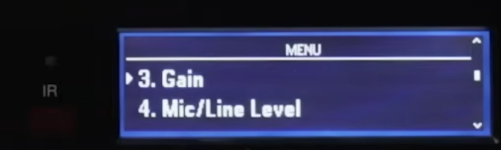
- Press the knob to enter the Gain setup menu.
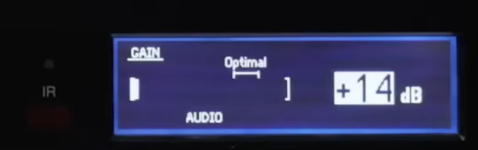
- Request the user of the microphone to talk at their normal speaking level, as if they were speaking during the downtime of a match. Rotate the knob so that the meter’s peaks and valleys average near the bottom of the range marked “Optimal”.
- Request the user of the microphone to make a loud, excited remark, similar to the loudest they believe they will be during the event. Ensure that this peak does not contact the top of the scale, indicated by the bracket symbol. If it does, decrease the gain by a few decibels and try again.
Which is more important, steps 4 or 5?
It is more important to ensure that the loudest sounds do not cause the input to be maxed out than it is to ensure that the low/normal sounds remain in the “Optimal” range. If both are not possible, prioritize making sure that high sound levels do not max out the levels.
-
When finished, press the “Back” button to save the settings. It is not necessary to re-sync the microphone for these changes, they are applied instantly.
-
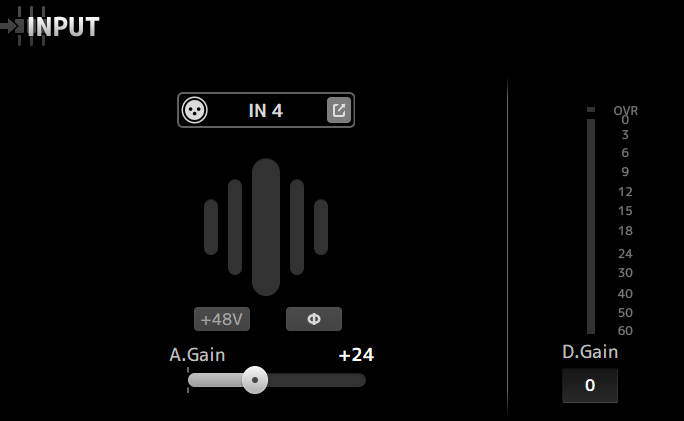
Move to the sound board and press the “Home” button on the right side of the board (lights up blue). Locate the channel that corresponds to the mic (match colors). Press the “SEL” button on the board that corresponds to that channel (lights up green). Tap on the symbol that contains six vertical lines of varying sizes, similar to the example seen below.

-
Follow a similar procedure to steps 4 and 5, but this time, utilize the slider on the screen marked “A.Gain” and the vertical lines as a guide. In this case, the “Optimal” range is indicated by the largest center line, which will light up green. The top of the scale is indicated by the rightmost line, which will light up red if reached. The red “OVR” indicator in the section to the right will also light up red to indicate maxing out of the signal.
-
Repeat the previous steps for each microphone that will be used during the event (typically four).
-
Initial gain settings are complete. However, keep an eye on these indicator lines during the event. If any begin to hit the red, it may be necessary to re-adjust the gain downwards. Keep in mind that the volume can be maxed out in two places: either in the microphone receiver or at the soundboard.
Stage 3f is complete. If you would like more information on operating the sound board, please check out the Sound Board Operator’s Guide. The next step is typically to carry out Stage 3a. You can also return to the index.