Materials needed: Distribution box (pagoda), twistlock power cables, camlock power cables, spider boxes, tri-tap extension cords.
Introduction
Danger: High Voltage
Electricity is dangerous. Treat all conductors as live unless you personally have tested them with a multimeter.
Do not grab or place your hands on conductors in a way that could make a circuit through your body.
There are two main types of control panel that can be found among the generators available: analog and electronically-controlled. Full descriptions of the interfaces can be found in the manual for the analog-controlled generator and the digital-controlled generator. This article will cover only the necessary items to interface with.
If possible, at least one person should receive training from the rental representative delivering the generator on Friday, which typically occurs around noon. They will show you basic operation including most (if not all) information in this article and how to operate the generator from these control panels. They will also show any specific items such as a battery cut-off switch that needs to be used. Models may vary from what is described here. The rental company sometimes ships other models of generator to FIRST Chesapeake events than the ones we request. In these cases, it is doubly important to get training from the representative.
Setup
Needs from Rental Company
Aside from training on the equipment, we operate under the assumption that the rental company has completed the following items prior to our beginning setup:
- Attached the ground rod to the generator and driven it into the ground.
- Chocked the wheels of the trailer.
- (If necessary) Attached camlock adapters to any lugs in the wiring compartment.
If any of these items are not completed when you arrive at the generator, consult with the Chesapeake representative for your event on next steps.
- Start with generator powered off. Do not start or power on the generator until told to do so later in these instructions.
- Open (turn off) all breakers on both the generator and distribution box. Breakers may be located in multiple places on the generator. The main breaker is located on the control panel. There are additional breakers located in the wiring compartment but they may need a larger door opened on the generator to access.
- Connect the Camlock cables to the generator in the following order:
(a) Ground (green)
(b) Neutral (white)
(c) A Phase (black)
(d) B Phase (red)
(e) C Phase (blue) - Connect the Camlock cables to the pagoda/distribution box in the same order as the previous step.
- Set the voltage selector to “3 PHASE 240/139”. This selector is located in the wiring compartment, but may need a larger door opened on the generator to access.
Start-up
Close all doors on the generator aside from that covering the control panel before starting the generator’s engine.
Tap to expand/collapse instructions on start-up of analog generators.
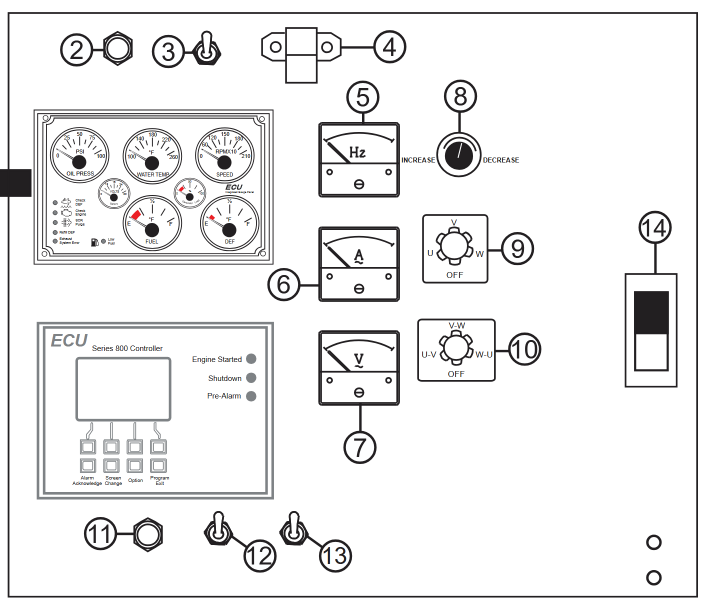
- Reference the analog controller diagram below when following the instructions. Where a particular control is referenced, the number on this diagram will be referenced in bold and within a set of parentheses, e.g. (#26).
- Set the Engine Speed switch (#13) to the Low position.
- Verify once more that all breakers on the generator and distribution box are off. (#14 and inside wiring compartment)
- Set the Auto/Manual/Off switch (#12) to Manual. The generator should start its engine and begin to idle.
- Observe the Frequency meter (#5) and confirm that the generator is outputting 60Hz.
- Observe the Voltage meter (#7) and verify that it displays 120V. Use the change-over switch (#9) to observe the voltage output on all three phases - each should be nominally 120V. If necessary, use the voltage regulator adjustment knob (#8) to increase or decrease voltage. Keep in mind that this adjusts all three phases at once, and individual control is not possible.
- Allow engine to idle for 1-2 minutes. Once that is complete, set the Engine Speed Switch (#13) to “High”.
- Close (turn on) the main breaker (#14). The other breakers should not need to be closed for the Camlocks to be energized.
- Ensure nothing is plugged into the 20A circuits on the distribtion box. Close the breakers for these outlets and verify that the voltage reading made at the 20A outlets with a multimeter matches the readings made by the generator (120VAC).
- Close the remaining breakers on the distribution box to energize the Twist-Lock outlets.
Tap to expand/collapse instructions on start-up of digital generators.
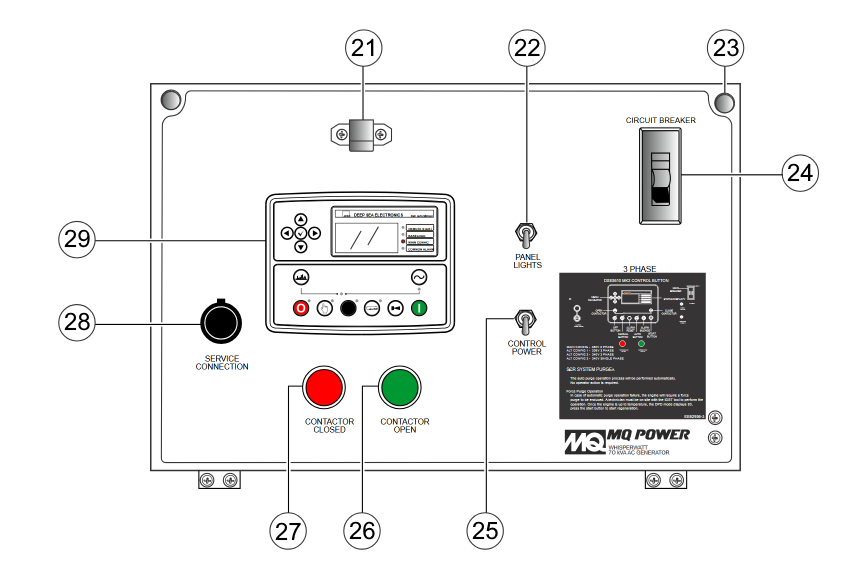
- Reference the digital controller diagram below when following the instructions. Where a particular control is referenced, the number on this diagram will be referenced in bold and within a set of parentheses, e.g. (#26).
- Verify once more that all breakers on the generator and distribution box are off. (#24 and inside wiring compartment).
- Turn on the controller’s power with the switch. (#25)
- Verify that the controller’s voltage and phase settings match that for “3 PHASE 240/139”. Some configurations we receive from the rental company have this shown on the LED panel (#4). If not, or if it is incorrect, follow the steps below.
a. Press the Off and OK buttons simultaneously. (#2 AND #16)
b. Press the right arrow key to access the Alt Config Menu.
c. The default screen should be Voltage Config. Use the up and down arrows to select the item that corresponds with “3 PHASE 240/139”, then press the OK button.- Press the Manual Mode button (#14).
- Press the Start button (#7). The generator should start its engine and perform a warm-up sequence.
- Press the right arrow key twice to page over to the generator status mode. Press the down arrow once while on the generator frequency display to view the voltages. Verify that voltages are nominally 120V across all three phases to neutral. The controller performs voltage regulator adjustments for you so there is no manual adjustment. If the voltages are incorrect, stop the generator (reference Shut-down section) and verify that both the mechanical voltage selector in the wiring compartment and the controller voltage settings are correct.
- From the voltage display, press the down arrow twice to view the frequency. Verify that the generator frequency is 60 Hz.
- Press the Contactor Close button (#5) and verify that the Contactor Closed lights both illuminate. (#6 and #27)
- Close (turn on) the main breaker (#24). The other breakers should not need to be closed for the Camlocks to be energized.
- Ensure nothing is plugged into the 20A circuits on the distribution box. Close the breakers and verify that the voltage reading made at the 20A outlets with a multimeter matches the readings made by the generator ( 120VAC).
- Close the remaining breakers on the distribution box to energize the Twist-Lock outlets.

Shut-down
Emergency Shutdown
Both types of generators have emergency stop capabilities via a red twist-lock E-Stop button on the exterior of the generator. In an emergency, use the button to instantly stop power coming from the generator.
Before doing either set of steps below, open (turn off) all breakers at the distribution box to remove load from the generator.
Tap to expand/collapse instructions on shut-down of analog generators.
- Reference the analog controller diagram below when following the instructions. Where a particular control is referenced, the number on this diagram will be referenced in bold and within a set of parentheses, e.g. (#26).
- Open (turn off) main breaker (#14).
- Set the Engine Speed Switch (#13) to “Low”. Allow to idle with no load for 3-5 minutes for the engine to cool.
- Set the Auto/Manual/Off switch (#12) to “Off/Reset”.
- Disconnect the Camlock cables from the generator in the following order:
(a) C Phase (blue)
(b) B Phase (red)
(c) A Phase (black)
(d) Neutral (white)
(e) Ground(green)
-
If the generator will be used the next day, lay camlock cables inside the doorway closest to the generator to provide easy access the following day. Otherwise, bring camlock cables inside in preparation for tear-down.
Tap to expand/collapse instructions on shut-down of digital generators.
Reference the digital controller diagram below when following the instructions. Where a particular control is referenced, the number on this diagram will be referenced in bold and within a set of parentheses, e.g. (#26).
6. Open (turn off) the main breaker (#24).
7. Press the Contactor Open button (#18).
8. Verify that the Contactor Open lights (#18 and #26) are illuminated.
9. Allow to idle with no load for 3-5 minutes for the engine to cool.
10. Press the Off button (#16) to shut down the engine.
11. Turn off control power (#25) once engine has completely stopped and come to rest for 1-2 minutes.
Tear-down
First, follow the steps in Shut-down. Ensure the generator is powered off before proceeding.
- Disconnect all loads from the distribution box.
- Disconnect the Camlock cables from the distribution box in the following order:
(a) C Phase (blue)
(b) B Phase (red)
(c) A Phase (black)
(d) Neutral (white)
(e) Ground(green) - If not completed previously, disconnect the Camlock cables from the generator in the same order as the previous step.
- Verify all lights in the generator control panel are off, and all doors are closed.
- Leave Camlock cables and any other rental company-provided power equipment with the generator.