Sound Board Tour
The Yamaha DM3 sound board is simple in its construction, yet powerful in functionality. Let’s briefly discuss each major part of the soundboard interface.
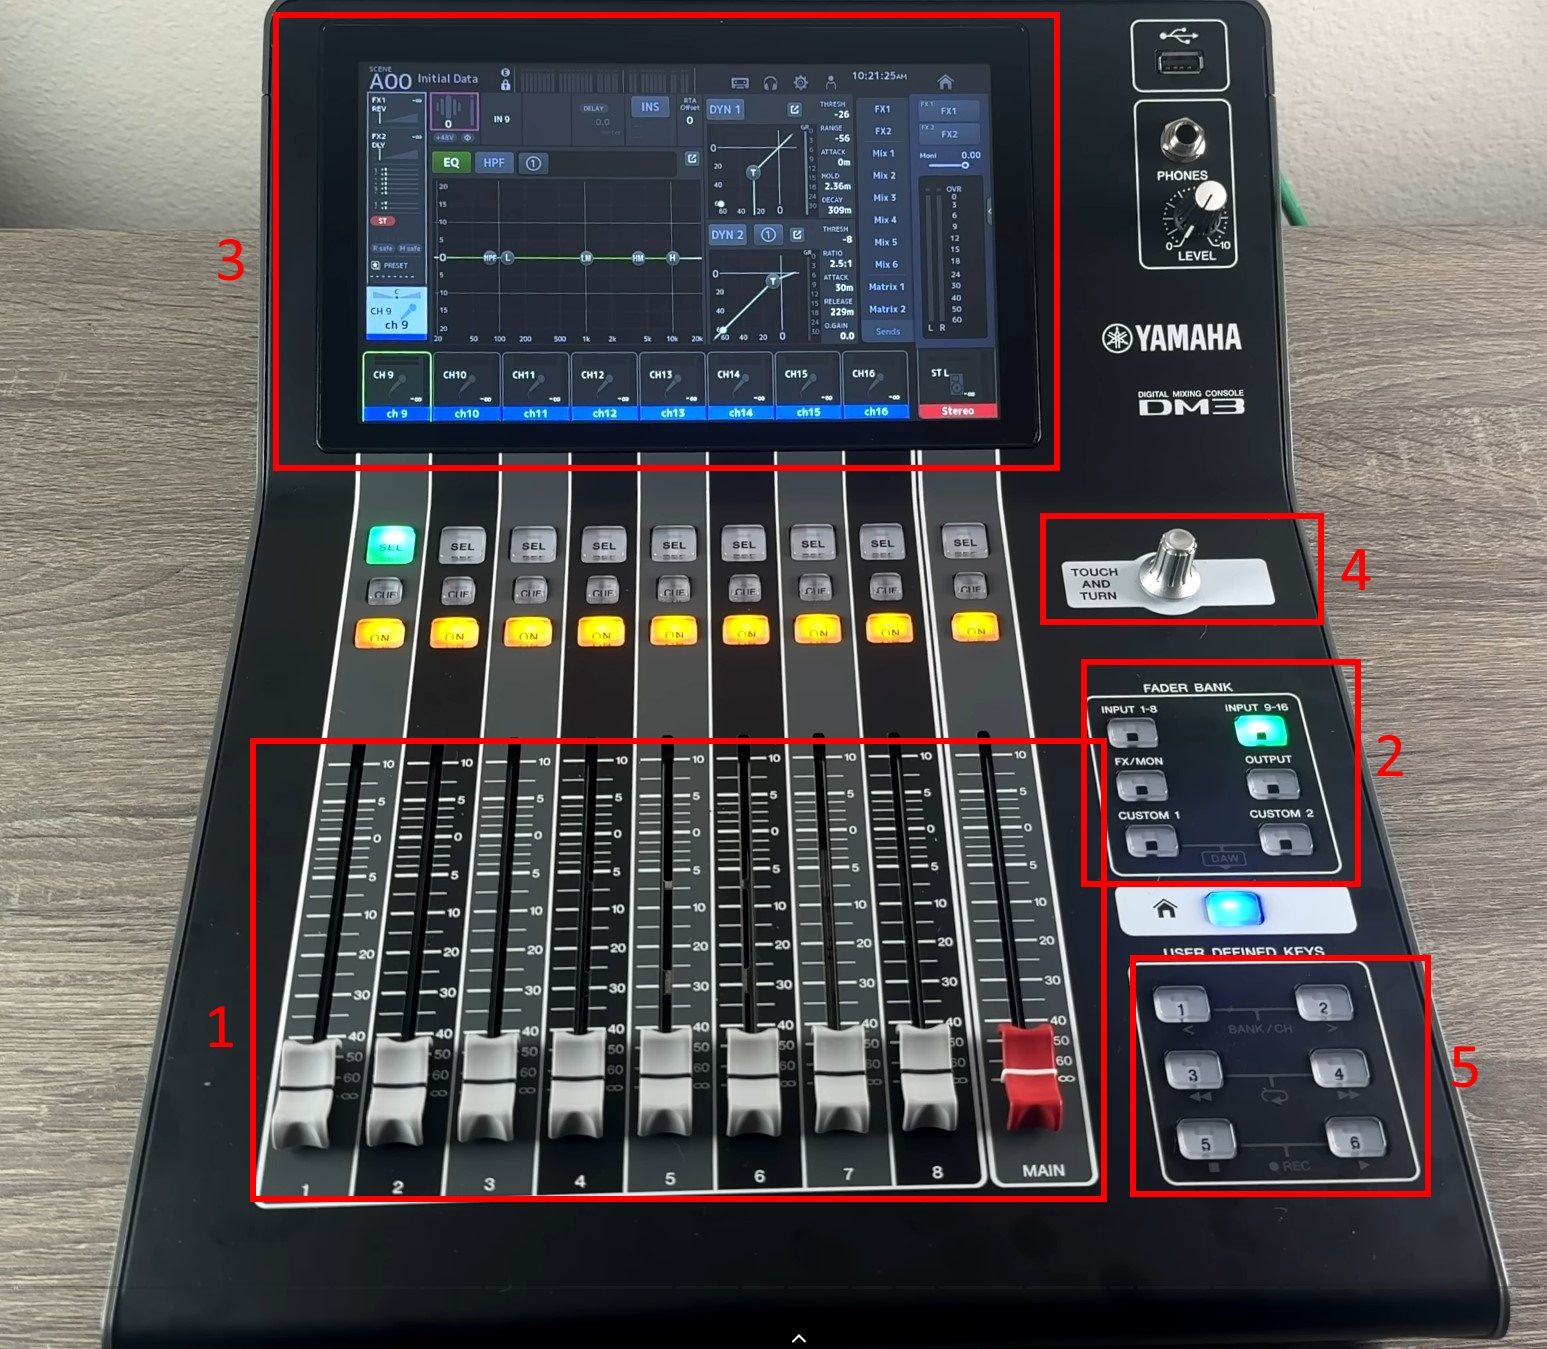
- This is the fader bank. It controls the volume for 8 channels at a time, plus the main volume control. There are more than 8 channels available to control on the DM3, thus these faders are not dedicated solely to a single channel. They change functionality depending on the mode that the sound board is in. To that end…
- This is the fader bank control. Pressing the buttons in this section change what the fader bank is controlling. There are four static fader banks (cannot be changed) and two custom fader banks (can be changed). We have pre-set the two custom fader banks to show the channels you will be most likely to utilize during the event.
Custom 1 Is Your Friend!
Custom 1 contains all of the faders you will need in all standard event scenarios. It should be your “home” fader bank setting for the event.
- This is the touchscreen. The bottom-most section of the touchscreen shows what each of the faders are currently controlling. In the picture above, it is controlling inputs 9-16 (which can also be seen by the illuminated fader bank control button). You will use the touchscreen to change parameters of the sound during setup and the event, such as loading the initial state preset and setting gain for microphones. Most parameters have been pre-set so that you do not need to worry about them. Advanced users will find the feature set of this mixer to be fairly comprehensive for any adjustments that may need to be made during the event.
Most settings in the center section of the mixer (between the bottom bar and the top bar) pertain to one channel. You can press the “SEL” button - This “Touch and Turn” knob offers granular physical control for many types of settings on the console. Touching certain controls (particularly sliders) on the console causes them to begin to slowly pulse with a red color. This means that the parameter can be adjusted using the knob. There are also some more unexpected areas that you can use this knob, so tap around to see what you can control (just don’t make huge unexpected changes in the middle of an important situation)!
- These user defined keys offer shortcuts to actions that are commonly utilized. In the current setup of the sound board, the user defined keys are setup as follows:
- Key #1: Mute all Lavalier microphones (a.k.a. Emcee mics)
- Key #2: Mute all Handheld microphones (a.k.a. Game Announcer mics)
- Key #3: Mute all microphones (excludes game sounds, video sounds, and music)
- Key #4: Unassigned
- Key #5: Unassigned
- Key #6: Panic Mute ALL (mutes all sound, regardless of source)
Wait, what’s a fader?
A fader is a special type of volume slider. It controls volume on a logarithmic scale to mimic how our ears perceive sound level. The scale is laid out in decibels (dB) from -∞ to +10, with the range from -5 to +5 being considered the most critical. This is why the markings in this range are much more frequent, with every dB being marked, instead of only every 2.5 dB. Faders allow smooth volume adjustments that are less likely to cause harsh drop outs or sudden increases. For best results, slowly adjust channel faders to adjust the balance in volume between different elements. Then, utilize the main volume fader(s) to make overall volume adjustments as necessary.
Our faders
If you haven’t already, press “Custom 1” on the fader bank controls as you read this section. For the microphones, note that the color strip on the mixer itself matches the color tape on both the microphone receivers and the microphones themselves. From left to right, we have the following faders:
- Lavalier microphone A (red)
- Lavalier microphone B (green)
- Handheld microphone A (yellow)
- Handheld microphone B (purple)
- Game Sounds
- Music - from the laptop
- Video Sounds
- Stream output level
- Main output level
All of the faders control input volume levels except for the last two. The last two faders control outputs. The red fader is for the volume going to the speakers and the event. The white fader is for the volume that goes to the livestream. You need to monitor these levels independently. More on this in the next section.
Tips for Soundboard Success
Determining the audio balance and levels is the most important part of being the audio operator. Too loud and the sound is irritating and even damaging; conversely, too quiet and crucial audio cues can be missed by the teams competing. Sudden volume changes can also be harmful. Keep a few of these tools in mind while working the sound board to maximize success!
Increase volume slowly
Volume should always be increased slowly and methodically. This has numerous benefits: it prevents startling anyone by sudden loud sounds, it has less chances of damaging speakers, and it allows spectators’ ears to adjust more naturally. When a microphone is in use, it also prevents the speaker and you from being surprised by a microphone that is suddenly much louder than anticipated.
Avoid “shouting” matches
Spectators, teams, volunteers and nearly everyone in the venue is conducting important conversation throughout the event. Excessive volume causes them all to shout, increasing the noise in the venue and drowning out the sound system. Be mindful of speaker volume increases, because we want those people to be able to conduct their conversations reasonably easily. In particular, music should be allowed to be drowned out by conversation. The music is not the focus of the event, it is meant to fill gaps.
Check decibel levels
Per the Audio Levels for FIRST Events guide, audio levels should be maintained at or below 80 dBA during normal event periods, with temporary increases not to exceed 90 dBA during periods of increased excitement. (Because the decibel scale is logarithmic, going from 80 dB to 90 dB corresponds to a doubling of the perceived loudness of sound!)
Sound level can be measured using a variety of tools, including many apps. Sound level meter apps are not a definitive source of truth due to varying device characteristics, but are useful to get a quick sense of the sound level in a given location.
Audio samples should be taken a few times per day, and adjustments made as necessary.
Reset audio levels between competition days
Over the course of the event, the audience naturally grows louder, and the audio system may have been adjusted accordingly. Overnight, however, ears rest and reset, and the sound system should follow. Decrease the overall system volume the following morning to allow easing into the second or further subsequent days of competition.
Follow the sound priority system
When determining audio levels, some sounds take precedence over others. At events, the priority system takes this form:
- Game sounds
- Emcee and commentator microphones
- Music
You should ensure that the relative volume of each sound source allows these priorities to shine though. The sound board helps you with this through the use of a dynamic volume adjuster. The sound from the music inputs is programmed to duck, or temporarily reduce volume, when any sound from game sounds or emcee and commentator mics reaches over a certain threshold. This is an intentional event sound design choice should not be altered or disabled by the sound board operator.
DM3 StageMix (iPad app)
You can remotely operate the audio mixer using the DM3 StageMix iPad app on the A/V iPad. You can perform the majority of operations on the mixer from this app, including volume and other parameter control.
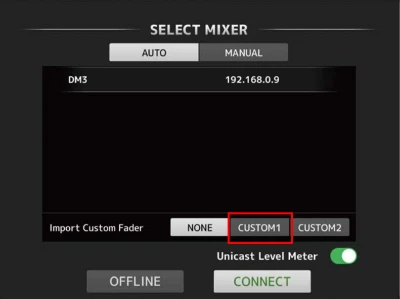
Getting the Fader Layout Onto the iPad
By default, the custom fader banks are not imported from the mixer to the app when connecting. You will need to select “Custom1” on the first screen of the app to sync them.
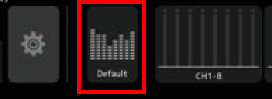
Once connected, tap the button at the top to toggle between default and custom order.
Soundboard Manual
The manufacturer’s manuals for the soundboard can be found here: